Managing Arena articles
An article is a text document written by an Arena administrator, or, if configured, any Arena user. Articles are published on the Arena site for other users to read and comment upon.
Starting with Arena 4.0, you are recommended to start using Liferay articles instead of Arena articles. The workflow in Liferay articles is more intuitive and it is easier to work with images. There is also support for version handling and restoring of deleted articles. Articles can be published and unpublished at a certain date and time. Arena articles will still be supported but will not be further developed.
Liferay articles can only be shared locally; not with other Arenas. Liferay articles cannot be linked to catalogue records – Staff picks is used for this functionality.
See also: Liferay articles
The instructions below are intended in case you still want to use Arena articles.
Creating an Arena article
- Sign in to Arena, and click the tab Articles & Tips (default Arena installation) or find the page where you have placed the portlet Article: Create article.
- Locate the Create article section.
- Select to use a template, if you wish, and fill in the fields that vary between different templates, and click Submit. Or select No template and click Continue.
- In the article editor screen, type the title of the article and select the language of the article.
- In Description type a brief description or synopsis of the article. This will appear below the article title in Arena.
- In Body type the body of the article. You can use HTML script to format the article, if you wish. You can add pictures and hyperlinks to the article, using the article editor toolbar.
- Subject, Content group and Content types are used for categorization of articles for searching and grouping.
- Records is used if you want to link an article to a catalogue record (or many). Write agency ID in Authority name and the record id in Record Id.
- Define the Display date for when the article should be published.
- Define the Expiry date for when the article should be removed from the site (that is, not be visible to end-users anymore).
- Use Start date and End date if you want to connect the article to the Event calendar.
- If the article is not yet ready to publish, tick Draft. Draft articles are not visible to other Arena users.
- Under Scope, select portal sites in the system where the article should be published. The site where you are logged in is selected by default and cannot be changed.
- Click Create. Clicking Cancel leaves the article without saving it
Adding links to an Arena article
You can link related articles, enhance navigation and reduce duplicated content by adding internal links to an article. You can also add external links, to web pages outside the portal.
- While editing an article, highlight the part of the text that should contain the link.
- Click the Insert/Edit link icon.
- For an internal link: Type the name of the page you want to link to, for example,
For an external link: Type the address of the website you want to link to. For example, type - In the Target dropdown, select how you want the linked page to open.
- In the Title field, type the text you want to present when you hoover the mouse over the link text.
- Click Insert
Publishing an Arena article
When writing an article, you may need to create and save a few drafts of it before you are happy for other Arena users to see it. When an article is marked as a draft, only you may see it. When your article is finished, you can enable other Arena users to see it by changing its status from draft to published.
| Note: |
|---|
| When you have published your article, it may still need to be approved by an Arena administrator before other Arena users may see it, if your Arena account does not have sufficient privileges. |
- Sign in to Arena , find the article you want to publish and click the article title.
- In the Article details section, click Edit (only visible if you have editing authorities)
- Untick Draft.
- Click Update to publish the article.
Editing an Arena article
- Sign in to Arena, find the article you want to edit and click the article title.
- In the Article details section, click Edit (only visible if you have editing authorities)
- Make your changes to the article.
- If the article is not yet ready to publish, tick Draft. Draft articles are not visible to other Arena users.
- Click Update. Clicking Cancel leaves the article without saving it
Deleting an Arena article
You can delete an article that you have written, at any time. If a published article is found to contain offensive material, it may be withdrawn by Arena administrators without notification.
- Sign in to Arena , find the article you want to delete and click the article title.
- In the Article details section, click Edit (only visible if you have editing authorities)
- Click Delete, and then click OK to confirm deleting the article.
Viewing the latest Arena articles
- Sign in to Arena.
- Click the tab Articles & Tips (default Arena installation). Find New articles on that page.
Alternatively, use the Arena portlet Articles: query search and configure it to list the latest articles.
See also: Articles: query search
Image library - Arena articles
Images that are to be included in Arena articles have to be uploaded to the Image library. You need to have image handling permissions to upload images.
In the default configuration of Arena, you find the URL to the Admin: images portlet in Liferay by clicking Go to/Control panel /Site pages and clicking Images in the site tree. There you find the Friendly URL. Type this address in the browser and you find the Image library.
See also: Admin: images and Admin: permissions manager
Uploading a file to the Image library
- Open the portlet Admin: images.
Alternatively, open an article, click the Insert image icon and then click the Browse URL icon. - Click Add folder to add a folder for your new images.
- Type a Name and a Description.
- If you want the folder to be available to more sites than the one you are logged in to, select these sites in the Published Scope dropdown. Other sites may then use your images but not edit them.
- Click Save.
You return to the Images tree. - Click on the folder name to open it.
- Click Upload image and Browse.
- Browse for your image, select Open and click Upload.
- Type an Image name (mandatory) and optionally fill in the rest of the fields.
- Click Save.
Adding an image to an article
- Open an article, and in the Body area, click the Insert image icon.
The Insert/Edit Image dialog opens - Click the Browse icon to locate the image and you want to use, and click on it.
You return to the Insert/Edit Image dialog. - Add a description and a title for the image.
The title will be displayed when hovering over the image. You can also add an Alt Img text to show when hovering over the image and to use for accessibility purposes. - Click Insert
Controlling the position and size of an image
- Highlight an image in an article, and click the image icon.
- Click the Appearance tab
- Fill in the data applicable:
Alignment: The position of the image on the page
Dimensions: The width and height of the image
Constrain proportions: Fill in either width or height and tick if you want automatic calculation of the other value.
Vertical space: Space above and under the image (px)
Horizontal space: Space to the left and right of the image (px)
Border: Black border around the image (px)
Class: Own definitions of class names; CSS can be used based on class name.
Style: Automatically filled in as you make the definitions above.
Tips: For the image to cover the full width, add width:100% and do not fill in Dimensions. - Click Update.
Searching images by name
- Click the Insert image icon in an article
The Insert/Edit Image dialog opens - Click the Browse URL icon
- Locate the Search box in the Image Gallery panel and type all or part of the image name you want to find.
- Click Search.
The search results will be listed below the Search box.
Browsing for images
- Click the Insert image icon in an article
The Insert/Edit Image dialog opens - Click the Browse URL icon
Below the Search box is a list showing folders that contain images in Arena. - Click a folder to display its contents.
Teasers
Arena uses teasers to showcase content in a minimalist format. A teaser consists of an Arena article with a headline, description, type and date.
Creating a teaser
- Sign in to Arena
- Add Articles: create article on the page
- Enter a short title and a short description.
- Enter the text body.
- Under Type select Spot.
- Set the time period the teaser should be displayed.
- Click Authorise.
If you plan to show teasers in different areas in Arena, add another ‘type’ to separate the groups.
See also: Articles: create article
Showing teasers
Teasers are shown in Articles: query search.
- Click Settings.
- Select search query.
- Paste: status:Ready content_type:spot.
- Configure the portlet to display title, title as a link and description.
- Sort by Changed and Descending.
- Click Save.
- Click Back to normal page.
- Click the settings wheel and select Graphic layout.
- Click Advanced style alternatives.
- Click spot three in the field Name your own CSS classes.
- Click Save.
See also: Articles: query search
Displaying the article from a teaser
To show the article a teaser links to, use the portlet Articles: article details on the page
- Configure the page to show Title, Content and Back button.
See also: Articles: article details
Creating an Arena article template
To make a new Arena article template you need to create three files plus a file with an icon image.
- A layout file
- HTML
- A structure file
- Variable names
- Variable types
- A property file
- Translations of the variable names and the translated name of the template
- An icon image
Things to remember
- All files for each template need to have the same name just different extensions.
- Variable names cannot contain ‘-‘ or spaces.
- The portal needs to be restarted after loading a new template to pick it up.
- Test before you try and deploy to a customer’s site.
Layout file
Create a file with an
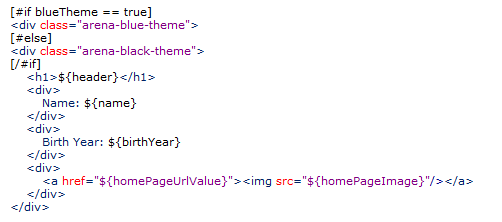
Example
- Create an
- Test the
- Take the mock-up and replace the variable parts of the structure with variable names;
- Make a note of the variable names.
Structure file
The Structure file is an
Create a file with an
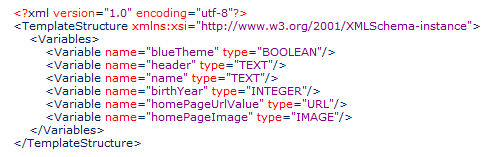
Example
- Take the list of variables you created within the layout.
- For each variable add an
- Choose the type of the variable that you want it to be and add it to the type attribute for that variable.
- Open the
The variables can be of type:
- TEXT
- BOOLEAN
- INTEGER
-
- IMAGE
Property file
Create a file with a properties extension (remember that the name of the file needs to be the same as the file you created for the layout).
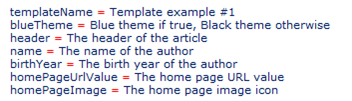
The text values contained within the file are used on the template (article) creation window to help the user understand what to put in each of the fields, as well as the name that appears in the template selection list.
Multi-language
If the system you are running is multi-lingual you may wish to create a property file for each language. To do this you need to create a new property file for each language.
The file name needs to be in the format of:
For example:
Example
- Create your master property file.
- Add variable
- Add a line for each of your variables (as per your structure and layout file).
- For each language you want it in:
- Copy the file and add the language extension to the new name.
- Open file and translate the text to the new language.
Icon image
To help the end user when selecting the template you may wish to have an icon/image to represent the template.
Create an image file with a
Deployment
When you have created all of your files you will need to deploy them.
- Click Manage article templates in the Articles: create article portlet.
- Click Browse and browse for your four files.
- Click Upload.
Sharing articles with other libraries
Libraries can collaborate to develop content using Arena, to share articles with text and images. Only Arena articles (not Liferay articles) can be shared with other sites.
If your library wants to work together with others, you should develop mutual guidelines not only regarding editorial content, but also regarding image sizes and page layouts.
Configuration
- Open Admin: installation details and click Name of portal site.
- Copy your portal ID.
- Get portal ID from other library.
- Expand Article Search Filters.
- Select Custom.
- Insert the following text, replacing the
See also: Admin: installation details
Example
Two libraries want to share articles on ‘
- Adjust settings as described above.
- Select portlet Articles: query search.
- Set the query to
- Write an article on a
- Set the article type to
- Under Publish select both libraries.
- Click Authorise.
See also: Articles: query search


Copyright © 2026 Axiell